Thursday, 3 April 2014
Thursday, 6 March 2014
Photography - Richard - Task 1
Workshop - Studio
When we first got introduced to the task, we were confronted with new types of techniques in photography.

Key Light - The main light in the studio. Aimed at a 45 degree angle and kept to one side. Mostly has a natural density filter
Back Light - Placed behind the subject that you're taking a photo of.
FIll Light - It fills the shadows from the main key light
Back Light - Placed behind the subject that you're taking a photo of.
FIll Light - It fills the shadows from the main key light
Side Light - Puts half of a persons fax win a shadow. Angled at 90 degrees.
Bottom Light / High Light - Lights lowered/extended to create a shadow of the person depending on the area
We were then told to use these techniques in the studio and create several portrait photos showing the body language and facial expression of our person who was going to be shot in the studio.
Put into several groups, we experimented with low-key lighting and normal lighting.
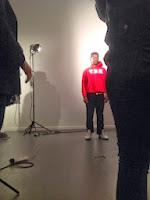 Here is the setup of what it looked like. We had all the lights functioning and set them up against the wall. Adjusting the light brightness each time we took a photo.
Put into several groups, we experimented with low-key lighting and normal lighting.
 Here is the setup of what it looked like. We had all the lights functioning and set them up against the wall. Adjusting the light brightness each time we took a photo.
This was my first photo. Tanaka was my subject. We told him to act surpassed. This gives the shadow more of a feature as a shadow. We had no issues capturing this photo. All we had to do was adjust the lighting height each time we took a photo of him because this gave us a range of shadows and shots to pick from.
 Here, I changed the hue & saturation in the photo with the blue effect. It's only a minor change because having too many effects ruins the photo's atmosphere. I also changed Tanaka and his clothing into a bright pink substance. I thought I'd just do this as I can get familiar with the photoshop tools.
Personally, I think the original photo stands out the most due to the originality. If I were to change this, I'd make everything in a monochrome colour to give the feeling of emptiness towards the audience.
 We then switched to low key lighting. This was more difficult because we didn't know what type of portrait photo to select. We finally positioned the low key light at a very low angle pointing up to a 45 degree angle. I was the shadow in this picture with the light pointing with Emily being the centre of the image. This gives the mood that someone is always watching and gives the viewer an unnatural feeling of feeling uncomfortable
 I didn't give much effect to this photo. I changed it to a monochrome image because the feeling of black and white gives the audience a perspective of horror. I prefer the edit to the original photo. It gives it that old horror film feeling. For example, Psycho by Alfred Hitchcock. If I were to improve this I would enhance myself a little bit in the facial area.
For our next shoot, we were told to 'think outside the box' to build upon our knowledge. We went out of the college to take several JPEG images using landscape terms like " conventional " and " abstract ". The four themes of the photos were : Glass; Time; Heavy & Space. The image had to either be abstract or conventional.

I went to the local university round the corner from our campus. This photo was located by some stairs and I thought I could use the exposure of the weather and the subject to really capture a good photo. My settings were :
Shutter Speed - 1/640 ISO - 6400 F - 11
I managed to use the manual focus to my advantage and focus on the railing and wall on the right side. It took me several shots to get this right

Thursday, 24 October 2013
Camera Lenses
With each photographer, they need to know what camera lenses are suitable for each shot. If they are using the wrong camera lens, their shot will not look as good as they wanted it to look. Here are several camera lenses and their speciality:
Standard Lenses:
 Standard lenses are typically 50mm when it comes to focal length. They have the same angle view of what we can see. Which basically means that a photograph using a 50mm lens will appear "Normal" or "Natural" to the perspective of the viewer. Many photographers use these lenses because because their fixed focal length and wide aperture give photographers the perfect ability to take photos in low light. Landscapes, portraits and candid shots are the most common photos which are taken using a 50mm camera lens.
 Here is a photograph of someone which was taken with a 50mm lens. Here you can tell the room is not well kitten but the iso on the camera gives the ability to focus on the image. And with the depth of field only focusing on the main image, it gives a well produced image towards the audience.
Macro Lenses:

Depending on the lens, macro lenses can either be 105mm or 75mm. Normally photographers use the 75mm because they still give a good quality photo without being too close.
Macro lenses are designed for close-up photography. For example, you may use a macro lens for taking images of insects or wildlife because you can grab detailed features of the object unlike other camera lenses. Since they have a different construction, they specialise in sharpness and contrasted photos. So when it comes to the final result, the photo will be phenomenal and eye-catching.

Here is an extreme close-up of an insect feeding itself. Without a macro lens, any other type of camera lens won't be able to produce the high-quality image at close range without being blurred or pixelated. It gives the audience a perspective that this photo is not natural and that it's like in another reality of the human-eye.
Wide Angle Lenses


For example, here is a wide angled shot of an animal in the field of a beautiful landscape. If this was taken on a standard 50mm lens, you wouldn't be able to capture the scenery behind the dog. With this, it gives photographers to adventure/experiment more into using wide shot lenses.
Tuesday, 1 October 2013
Camera Techniques
Over the past few weeks, we have been practising with SLR Cameras which feature a number of techniques, such as : Aperture, shutter speed and ISO. All of these techniques can judge a photo instantly depending on what the settings are set to.
Shutter Speed :
Shutter speed controls the light and motion detected in a photograph. The camera auto focuses on the object ( can be done manually as well) and takes the photo. Shutter speed is read as a fraction. Ranging from:
1/4
1/30
1/260
1/1000
The quicker the speed, the better the freeze lotion will be. This is so you're can capture moving objects without blur. But it lets less light in and gives it a darker image depending on what the setting is. Vice versa for a speed. More light in the photo but it has a blur lotion.
Aperture:
With aperture, you can stabilise the depth of field in the photo. For example, if I wanted to just capture a photo of the object in front of me while everything else is blurred, I would give it a short depth of field. So that would be an F stop below 4. If I wanted the whole background, I would have a higher F stop. You can use many camera lens for aperture. Preferably people would use a wife angle camera lens to capture the whole background.
Iso:
ISO is what sensitivity your camera is. If you were to give a low ISO setting, it would be less sensitive towards the light and it would have more grain. People use higher ISO to gain a faster shutter speed and is typically used in dark areas and backgrounds. 100 ISO is the normal setting as this gives a crispier shot and it has less noise.
Here is an example of all the settings in their work.


Tuesday, 24 September 2013
My Unit 57 Photography Idea.
Idea: At the moment, I have two ideas for my album cover shoot. In the first one I plan to shoot a unusual , comedy style album cover where none of the artists are featured. This is shown in albums that feature in Rap and rock. I think this will be effective because artists like OFWGKTA use this for their album cover. They use edited photos that don't belog to them. For example, they portray their only white member Lucas Varetti, as one of their main images. On the other side of the album cover, they have a kitten's head flying through the clouds. They have combined other albums released by the group and put it in a collage titled @ OF Tape. Vol 2.
My other idea is a collage of two artists in 4 different photos. My inspiration this also came from OFWGKTA because of the layout and the cover of Demon Days by Gorillaz. They have their band animated and put into individual frames. I will do the same, but with just two people looking at the camera at different angles.


Location/Studio: For my first idea, the location is going to be in an office type area. I plan on shooting my photo at the AQA Examination Board offices down Oxford Road. Here I will use my friend who works at the office, sat down on his desk performing a pose.
My second idea will either be shot in a studio or at a local area. Here I will do 2 portraits of the two artists looking at the camera from a different perspective. I will have to make sure that the image is clear and that there are no disturbances.
Technical Considerations:
For my office shoot ad my portrait shoot, I will have to consider how the light is portrayed. The room is a very well lit room which I need to understand carefully. I will be focussing on the person in the middle. So I will have a low Aperture so my depth of field isn't that big as I only want to focus on one person. I will have a high shutter speed to ensure the quality of the image doesn't blur. And my ISO will vary depending on the brightness of the image.
Idea 1:
ISO- Vary
Aperture - F10 or below
Shutter Speed - 50+
Idea 2:
ISO- 100
Aperture -F10+
Shutter Speed : 50 or below
Photographers.
Jim Zuckerman
Jim was originally a medical student in the early 70's. But he decided that his future was photography. Jim is widely known as the most professional photographer at this date and from my perspective he shoots photos that can really affect others. His photos are normally published either on his website or in books that relate to nature. Recently, his photos are used for packaging in 45 different countries.

Alisdair Miller
Raised in Zimbabwe, Alisdair works in many locations. At this current point in time, he is working in Dubai with photographers that have travelled the world. He learned how to do photography with professional help off others. He has studied commercial art and design and now takes photographs which feature all over his webpage and news articles.

Ansel Adams
Ansel Adams was regarded one of the best photographers of his time. He produced stunning images of landscapes and environments which blew everyone out of proportion. He normally presented his photos in black & white to capture the emotion of the image he was taking.

Annie Liebovitz
Liebovitz produced professional photos during the 70's/80's which featured on many magazines such as " The Rolling Stones ". She now works on Disney themed photographs . Her photographs have been described as intimate and how she isn't afraid to fall in love with her photographs, which give her that unique style in taking photographs.

Subscribe to:
Posts (Atom)